Ðề: Mô phỏng PZT trong Ansys APDL
Dear all,
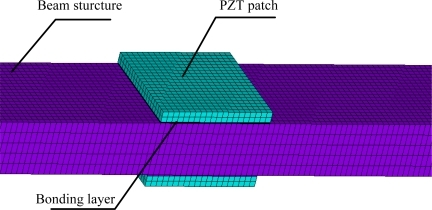
Em đang mô phỏng tấm PZT trên dầm (như hình bên dưới) trong Ansys APDL nhưng gặp khá nhiều khó khăn, em đã tìm tài liệu trên mạng nhưng số lượng khá ít và không rõ ràng. Nên mạng phép tạo bài viết để hỏi xin tài liệu của các thầy các anh em trên diễn đàn hỗ trợ. Mong nhận được sự trợ giúp của các thầy và anh em diễn đàn.
Regards,
Quan N
1) mô phỏng tấm PZT cho vấn đề gì ? mô hinh vật liệu thế nào ?
2) có biết dùng Ansys APDL lập mô hình chăng ? Đưa codes lên xem.
a) Xem
https://www.researchgate.net/post/How_do_I_model_a_PTZ_patch_sensor_in_ANSYS
Hi, Follow the following steps to model the PZT patch in ANSYS
Step 1: Preferences-- Structural + Electric
Step 2: Preprocessor-- Element Type -- Add (Elemet 1: SOILD65 for RC Element 2: Solid5 for PZT patch)
Step 3: Preprocessor-- Material Properties -- Material Models -- Material Model Number 1

properties of RC beam which you are modeling)
Step 4: Preprocessor-- Material Properties-- Material Models -- Menu bar -- New material -- Define Material ID 2-- ok: (properties of PZT patch)
Step 5: Preprocessor-- Modeling -- Create -- Volume -- (Create the volume of beam and PZT patch and arrange it in the desired location)
Step 6: Preprocessor-- Modeling -- Operate-- Booleans -- Glue -- Volumes (RC beam and PZT patch)
Step 7: Preprocessor-- Meshing -- Mesh Tool -- Global -- set -- SIZE Element edge length -- (Assign the required size) -- Mesh -- Volume -- (select Volume) -- MESH
Step 8: Preprocessor-- Modeling -- Move/Modify -- Elements -- (Assign Material Type 2 and Element Type 2 to the PZT elements). You can check the material and element types from PlotCtrls menu -- Numbering -- Elem / Attrib Numbering (Element number and Material number)
Step 9: Preprocessor-- Coupling / Ceqn -- Couple DOFs -- Select all the bottom nodes -- ok -- NSET Set reference number '1' -- Lab -- Degree-of-freedom label "VOLT"
Step 10 : Repeat Step 9 for the Top Nodes and Set reference Number '2'
Step 11: Preprocessor-- Loads -- Define Loads -- Apply -- Structure -- (Appply the Boundary conditions and other necessary loads on Beam)
Step 12: Preprocessor-- Loads -- Define Loads -- Apply -- Electric -- Boundary -- Voltage -- (Apply required value of voltage in the PZT patch)
Step 13: Solution-- Analysis Type -- New Analysis -- Harmonic
Step 14: Solution-- Load Step Opts -- Solu Printout -- Every Substep
Step 15: Solution-- Time/Frequenc-- Harmonic Frequency Range (HARFRQ) and Number of substeps (NSUBST) -- (According to the desired output)
Step 16: Solution-- Time/Frequency-- Damping -- (Values of Damping Specifications)
Step 17: Solution-- Solve -- Current LS -- ok
Step 18 TimeHist Postpro -- Add Data-- Reaction forces -- Current Flow (labelled as AMPS) Select the master coupled node. -- Real/ Imaginary -- (you have the solution as the real and imaginary components)
Thus you have "charge" as output.
Obtain "Current" from it. You have "Voltage" as Input. Ratio of current to voltage is admittance.
b) Xem thêm:
https://www.sharcnet.ca/Software/Ansys/17.0/en-us/help/ans_cou/Hlp_G_COU_micro.html
c) Application of ANSYS APDL in the Design of Piezoelectric Transducer ...
www.atlantis-press.com/php/download_paper.php?id=25839263
von F Li - 2015 -
Application of
ANSYS APDL in the Design of
Piezoelectric Transducer ... conditions and solution, the final
simulation results are close to the test value of the ...
d) Luận văn Th S ĐH ở Canada, có codes Ansys APDL trong đó.
http://citeseerx.ist.psu.edu/viewdoc/download?doi=10.1.1.136.3601&rep=rep1&type=pdf
e) thắc mắc tương tợ của KS kết cấu
http://www.ketcau.com/forum/showthread.php?t=75090
f) ANSYS 15 Mechanical APDL Couple field, 288 Page có chỉ dùng codes !
http://148.204.81.206/Ansys/150/ANSYS Mechanical APDL C/Analysis Guide.pdf
g) trao đổi có APDL codes trong Dđ xansys.org
http://xansys.org/forum/viewtopic.php?p=49719&sid=9fc6ae87a8b199d22f0c3420ee376daa
Tài liệu trên mạng có khá nhiều đấy, cần nắm vững căn bản tốt về điện tử ... e rằng bạn xem TL tiếng Anh không hiểu !